| Home Page
Photo Page
Custom Page
Custom2 Page
Favorite Links Page
Custom3 Page
|
|
|
JET Chip http://www.jetchip.com/
249 Dollars. The best money I ever spent! Man it took me like 10 minutes to install, and 2 seconds to make Ewing blvd. look like Hiroshima! Oh my god what a difference! Like night and day! Your computer is located on the pass side behind the kick panel. Remove a few screws, pull out the puter, scrub the circuit board with the supplied scruber from JET, and plug her in. The Engine light also shut off from the Bassani X-Pipe install after I installed the chip. They don't tell you, but you have to run a little higher octane gas now. 87 will knock and ping on hot days. You might be able to get away with 89, but I always run Sunoco 94. I have no probs with it. Don't waste your money on higher octane fuel. I have run 104 Race fuel and didn't notice a bit of difference, besides my wallet being much lighter.
|
 JET Chip
|
|
|
|
BBK 70MM Throttle body http://www.BBKperformance.com/
129.50 I installed the MAC Cold Air Induction and throttlebody at the same time so I can't honestly tell you the performance difference of the two, but I can tell you that together, they make a difference! Now some things you should know. Your new throttle body does not come with a new throttle position sensor or the two screws that hold it on. You can get the sensor at your local parts store for around 35 dollars. The screws are 2 dollars a piece. Yup! A piece. Oh you say why not use the old ones? Ha good luck getting those suckers off. Ford uses some special loctite on them and you will never get them off without destroying them. Trust me, mine are trashed! I left the old sensor on the old throttle body incase I sold it or ever wanted to put it back on my car. It took 15 minutes to change and is very easy to do.
MAC Sub Frame Connectors http://www.macperformance.com/macstore/mustang/mstng_suspen.asp
99.50 This was the first performance upgrade that I installed. If your gonna beef up the car strengthen it first before you twist the frame. If you twist the uni-body on your stang there is no straightening it out later, your screwed! Start now before you do any performance upgrades. These were fairly easy. Took Two and a half hours to complete. NEVER Bolt these things in! Always weld them. If you bolt them, the twisting of the car will start to shred your under body and the holes on the sub frame connectors making them useless. Sand off all the paint after you trial fit the connectors under the car, and then get someone to weld them up for you if you do not have a welder. Be careful on the pass side underneath the pass seat of the fuel line when welding. I put a cold wet cloth around mine and it was fine. After your done, shoot some paint on the welds to stop them rusting from starting and your ready to go.
|
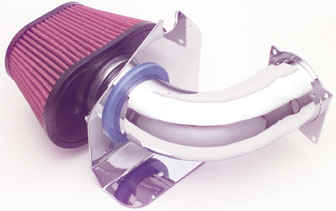 MAC Cold Air Induction http://www.macperformance.com/macstore/mustang/mustang_cold_air_systems.asp
135.00 Pain it the butt!! You will need some WD-40 on this baby and 1 other person. I had the unfortunate no friends around syndrome when I did mine. Was not fun. The new K&N filter they give you will have to go through the bottom of the fender. There is a little hole down there to squeeze your arm through. Wear a long sleeve shirt no matter how hot it is outside, your arm is going to get chewed up on the fender. Now you have to hold the filter in place so your buddy can slide the cold air sys. Into it, then you have to reach your arm back through that little hole feeling with your fingers (because you can not see up there) for the hose clamp screw to hold the filter on. I also removed the screen from the stock MAF to get a little more airflow through there. Now just bolt the rest up and you are ready to go racing. Makes a great sucking sound now when you tromp the pedal a little. With this and the throttle body installed, I definitely noticed a seat of the pants feel taking off and going through the gears. Money well spent!
MAC Cold Air Induction http://www.macperformance.com/macstore/mustang/mustang_cold_air_systems.asp
135.00 Pain it the butt!! You will need some WD-40 on this baby and 1 other person. I had the unfortunate no friends around syndrome when I did mine. Was not fun. The new K&N filter they give you will have to go through the bottom of the fender. There is a little hole down there to squeeze your arm through. Wear a long sleeve shirt no matter how hot it is outside, your arm is going to get chewed up on the fender. Now you have to hold the filter in place so your buddy can slide the cold air sys. Into it, then you have to reach your arm back through that little hole feeling with your fingers (because you can not see up there) for the hose clamp screw to hold the filter on. I also removed the screen from the stock MAF to get a little more airflow through there. Now just bolt the rest up and you are ready to go racing. Makes a great sucking sound now when you tromp the pedal a little. With this and the throttle body installed, I definitely noticed a seat of the pants feel taking off and going through the gears. Money well spent! |
MAC Cat-Back http://www.macperformance.com/macstore/mustang/mstngctbck.asp
299.00 The MAC Cat-Back looks just like the picture, beautiful! It took 1 hour to put these babies on. You will need to cut the factory exhaust off because it is 1 piece. I used torches, you can use a saw zaw or hack saw, then loosen the 2 10mm bolts. Lower the muffler down and pull it back to remove it from the h-pipe. Use WD-40 again on the rubber hangers to get the old exhaust off and just slide the new one up in place. Oh was that easy! Make sure you have clearance around the axle and that you clear the shocks before tightening everything down. Now just wait till you start it! Oh my! People will move out of your way. You will definitely have a presence now rumbling through the parking lots. My car does have a drone on the highway at 2000 RPM, but other than that, it sounds great! You can feel it in the seat of your pants too! |
|
|